Monday 6 September 2010

Paper cards

In the final process of creating the card images I have decided to go back to the original plan of creating 50 images, 10 for each card area which I had thought originally was a little ambitious.

The other issue that has manifested itself has been that although all the images join up nicely, when they are shuffling in to position it's not evident that they are cards as they are too seamless! I've had to add a card or paper overlay so that they appear to be cards as the original victorian cards would have been.

Thursday 1 July 2010

3 new backgrounds created

It's turning out to be a slow process as usual! The original intention to create 50 unique images, 1 for each bay multiplied by the number in the array (10) has been changed.

So there originally was going to be 5 images that join x by 10 options. The change has been for two reasons, the first is the complexity of using photographs, each image has to join perfectly and it's incredibly time consuming. The second reason was the way the card values are used to control the image, initially I didn't want the images repeating, which explains the 50 cards, my concern was that it may not have been evident that there was a direct relationship to the card value and the image itself, whereas with only 10 cards in total now the card number when repeated in the sequence would show the same card in the joined up sequence.
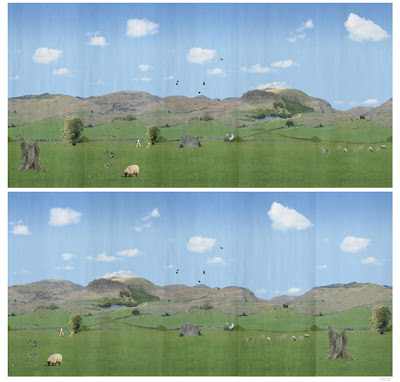
(3 images below created with new background images for test purposes)


Other issues to note:-

The grass has been colour balanced with the background fields and the grass now repeats perfectly and no longer shows the joins.

A shrub and hedge has been placed left and right in order to seperate and join the 2 fields, this adds a visual illusion of depth but also allows for other elements to be added around it.

The foreground needs some work, the linear feel needs some working on. a zigzag 'Z' of images may be introduced to break the horizontal.

The sky will need to be sorted at the end of this process to get the clouds in the correct position to make it seem accurate to the scene.

The development images created in photoshop are now been stored on the online Microsoft Skydrive account so that I have access to them wherever I am, this also seems pretty stable and a secure place to backup to also.

Monday 26 April 2010

Development of the image


This image defines the process of creating the original template for the Myriorama.

Sunday 25 April 2010

3 images combined stage 2


... and this is the result of working out the next stage, the foreground is still a little bit wrong but it's now got a foreground, midground and background which allows for more development in each area. The size of each panel has also been increased to 275 x 660px, still small but allows for greater movement of components.
Clouds also introduced. The background is a continuous colour gradient in photoshop (#a7d2f4 to #669cda) with the clouds dropped over.


3 images combined

3 images combined to create the first stage of the Myriorama, although this seems to now be working the limitations of a flat foreground and no midground has limited the use of this images as a base template. only foreground images can be added as the background is too distant.
With 50 images required to complete the project, this image is no longer suitable. This has been frustrating as it's taken a day to take the images and at least another day in photoshop to align all the components. I was up until 1am last night and it's now back to the drawing board.
On the plus side, I've learned a lot through a number of mistakes!


Tuesday 30 March 2010

Scale...


Big sheep, little sheep! Same size sheep!
Scale and perspective is going to be critical. This is something I hadn't factored in yet.

Phew! The foreground now joins up.

I now have a working foreground using a single image that repeats and continuously joins up.

I have decided to use a 250px x 600px image size for each panel, this should allow for additional content within each area as the original 232x600 format was a little too restrictive as it was too narrow. In order to achive this I have reduced the panels to 5 from 6, final image combined is 1250 x 600.

Additional foreground content will be layered over the top of these images but the first step was to make it join up initially with a single image. I will then introduce a series of hills, mounds and drumlins over these before any foreground detail can be added, which may include, walls, stiles, hedges, people, sheep! etc.


Thursday 18 March 2010

The frustrations of joining images

It's not quiet jelling at the moment, the difficulty is the creation of seamless joins between the foreground and creating a realistic join for the midground and background.
Warping works up to a point but cannot be used to create a realistic representation of a hill or mountain, it's main use will be in skewing the image to fit the parameters within each section.


I have also increased the size of each panel to 232px x 600px which will either create an image of 1160px x 600px with 5 panels in use or 1355px x 600px if 6 panels are created. The difficulty is knowing how the final series will be displayed depending on the monitor size and resolution.
The last project Ubiquitous Interactivity at the Cornerhouse used a 42in screen set at 1360x768 so consideration for the size of each panel image and the overall screen coverage will have to be taken into account.

Thursday 4 March 2010

Warping refined


With each section image now at 195px x 600px is this too small? The overall image length is 1160px as there are now 6 images that build up the image, if this gets reduced to 5 there will be more scope to put more content within each section as it will be wider but less combinations for the overall effect.

The UCLAN student/staff card values

Every staff and student card has a 16 digit number similar to credit cards, the one problem is that every card has the following at the beginning 20107101, then this is followed by a random sequence of 6 numbers, which is then topped off usually with a 1.

So, the sequence goes something like this...

2010710094121917

array object 0 = 2
array object 1 = 0
array object 2 = 1
array object 3 = 0
array object 4 = 7
array object 5 = 1
array object 6 = 0
array object 7 = 0
array object 8 = 9 *
array object 9 = 4 *
array object 10 = 1 *
array object 11 = 2 *
array object 12 = 1*
array object 13 = 9 *
array object 14 = 1
array object 15 = 7

* In order to generate a unique image based on the card values I intend to use 6 numbers from object 8-13, in the example above I will use 941219 as the sample value.

Tuesday 2 March 2010

Myriorama background image

I've been pondering on how to get the backgrounds to join up for the myriorama, this is a test image using the same image of a field and warping the structure in photoshop cs3, then using guides in order to keep the structure for the joins.


This should then become the canvas for each image to be built upon.

Wednesday 10 February 2010

Artists talk

I will be giving a talk about my current work to students at UCLAN on the 15th February. Although I've giving a number of talks over the last year I'm still a little nervous of showing my work to other people, especially when the work is at the development stage.

I'll probably finish the talk with the Myriorama work, I've got the card reader working with this piece now and hopefully the students will have their student id cards with them so there will be an interactive element to the talk.